Comprehensive Terminal Crimping Machine Guide: From Die Details to Troubleshooting
Detailed Analysis of Terminal Crimping Machine Dies
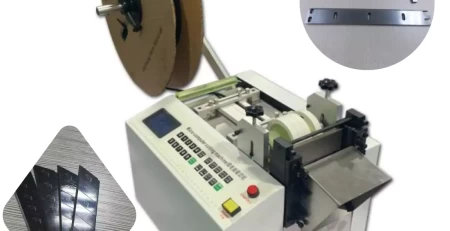
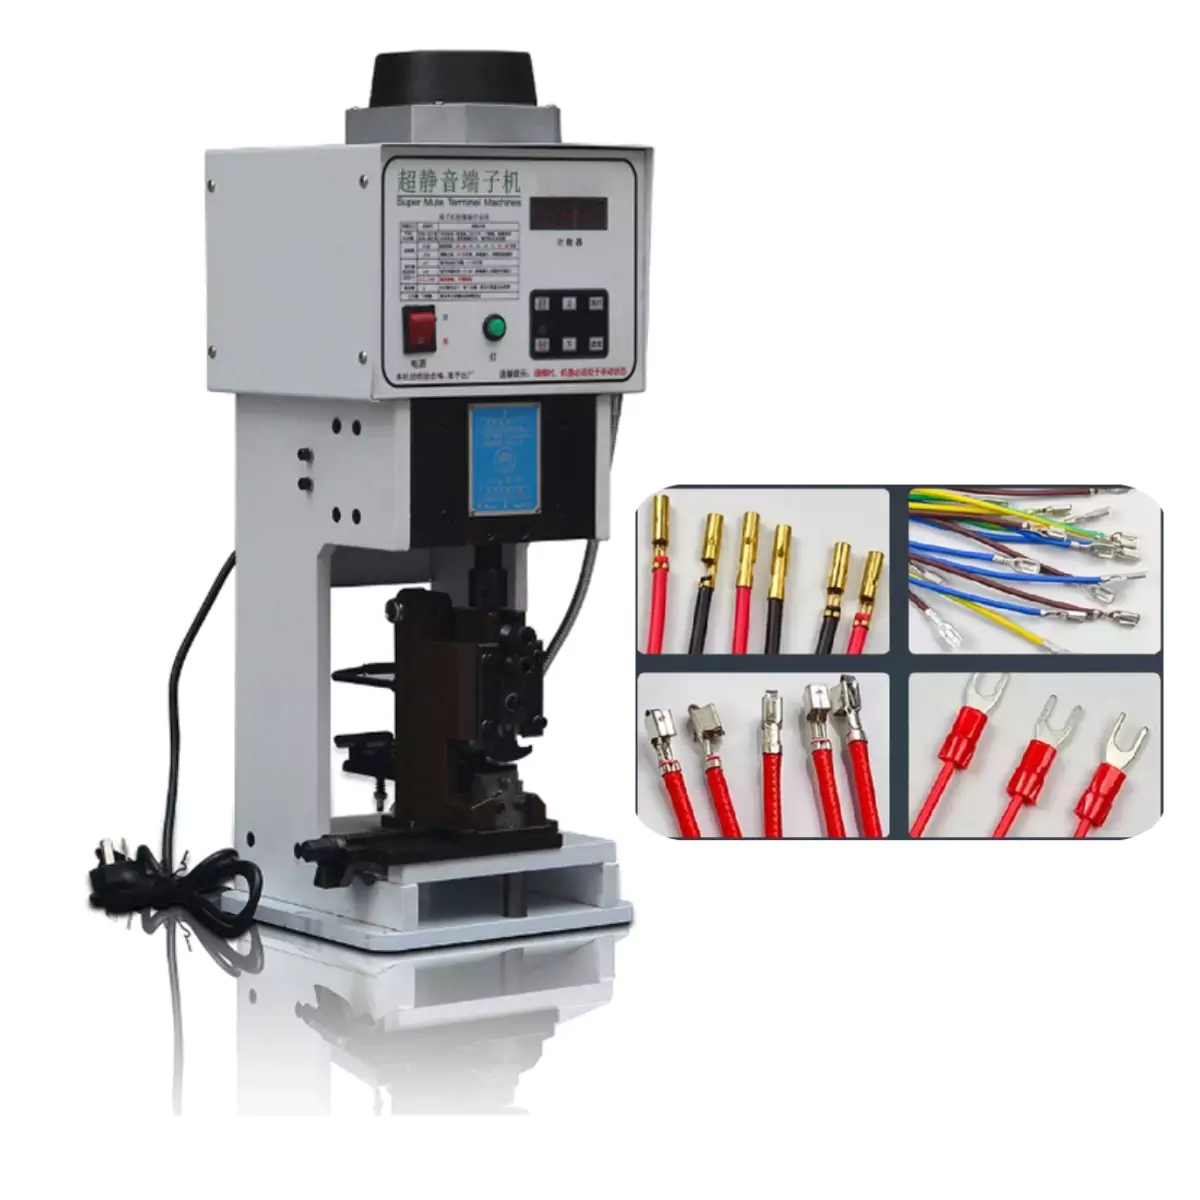
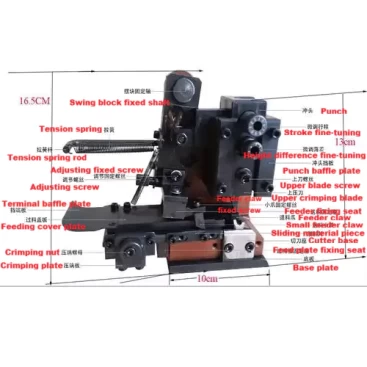
The die part of the terminal crimping machine is a key component of the equipment. Its design directly affects operational efficiency and product quality. By observing the intricate structure of the die, we can gain a deeper understanding of the terminal crimping machine’s internal construction and working principles.
The die section of the terminal crimping machine demonstrates exceptional craftsmanship and a meticulous structure. Every subtle design detail reflects the ingenuity of the engineers and their persistent pursuit of efficiency and quality. By deeply analyzing every detail of the die, we can more comprehensively understand the precise operation and outstanding performance of the terminal crimping machine.
Operation Guide
When using the terminal crimping machine, it is essential to follow a series of operational guidelines to ensure the equipment’s proper functioning and personnel safety. These guidelines cover every step from die preparation and machine startup to actual operation, aiming to help users easily master the machine’s usage techniques. Following these guidelines not only improves work efficiency but also effectively prevents potential safety risks.
Power Switch (Power): The ON position turns on the terminal crimping machine, while the OFF position turns it off.
Light (Light): Press the button to turn on the light; press it again to turn it off.
Counter (Counter): The counter precisely records the number of uses during operation.
Reset (zero): Used to clear the counter and restart counting.
Indicator Light: Red indicates the current mode is manual, while green indicates the automatic mode.
Auto/Manual Switch: Used to switch between automatic and manual modes.
Manual Up/Down: When the indicator light is red and manual operation is required, hold the corresponding key, and the slider will move up or down accordingly.
Reset Button: If the machine fails to work properly after being powered on, use the reset button to restore its normal working state.
Safety and Operation Precautions
When using the terminal crimping machine, it is crucial to follow a series of safety and operation precautions to ensure your safety and the stable operation of the equipment. These precautions cover basic machine operation, safety measures, and handling of common issues, aiming to help you better master the machine’s usage techniques and safety regulations. Adhering to these precautions not only ensures safe and error-free operation but also effectively improves your work efficiency.
Before turning on the power switch, you must ensure that the wrench has been removed from the operating position.
Before starting up, the punch should be adjusted to its highest point to ensure safety.
Avoid simultaneously crimping multiple terminals to prevent equipment damage.
Please ensure the voltage is stable (a voltage stabilizer is recommended) to guarantee the machine’s lifespan.
Before turning on the power, please ensure your hands are completely clear of the machine to ensure safety.
When the operator adjusts the die, the machine must be placed in manual mode (i.e., the indicator light is red).
Malfunctions and Maintenance
During the use of the equipment, malfunctions are unavoidable, so mastering troubleshooting methods and appropriate maintenance measures is particularly important. These methods not only help extend the equipment’s lifespan but also ensure its efficient and stable operation.
A. If the foot pedal switch fails, please replace it with a new one.
B. If continuous striking occurs, please check if the proximity switch is functioning properly.
C. If the fuse blows, please replace it with a new fuse immediately.
D. If the machine’s movement becomes sluggish, it is recommended to add 1-3 drops of grease daily to the oil holes of the slider (1 hole and 3 sliding surfaces) and the die (3 holes). At the same time, please ensure the machine’s working environment temperature is between -2° and 50°.
E. If the motor malfunctions (e.g., smoking, emitting a peculiar smell), please immediately replace it with a new 180W motor, and pay attention to the motor’s voltage requirements.
F. If the die is stuck and cannot move up or down, use a wrench to turn the screw at the end of the main shaft. This will cause the main shaft to drive the slider up and down, thus moving the punch. Check if the upper and lower crimping blades are scratched or damaged by the terminals, and adjust accordingly.
G. When changing the blade die, you must place the machine in manual mode. During the replacement process, please pay attention to adjusting the overall height of the die, fine-tuning the height difference between the upper inner and outer blades, and making appropriate adjustments to the feeding part.
Anomaly Protection and Handling
Display Codes and Handling Methods:
E_O Hardware protection. Check for short circuits or stalls.
E_OU Overvoltage. The power supply voltage is too high.
E_LU Undervoltage. The power supply voltage is too low.
E_OH Drive overheating. Check if the fan in the electrical box exhaust port has stopped.
Adjusting the Number of Crimps
Press and hold the “Spare” button on the machine’s panel for 4-8 seconds until program number D001 appears. Then, use a combination of “Zero” (up adjustment) and “Auto/Manu” (shift) to adjust the program number to D112. After confirming, the display will show “1” (the number of consecutive crimps). Next, use “Zero” (up adjustment) or “Star” (down adjustment) to set the desired number of crimps, and finally press the “Spare” button again to confirm.
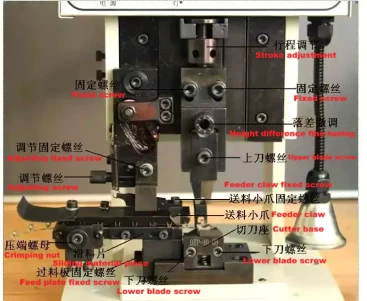
Die Debugging and Installation
7.1 ► Blade Installation
When installing the blades, ensure that each blade is correctly in place to guarantee the proper functioning of the terminal crimping machine. During terminal crimping machine blade installation, pay special attention to the distinction and adjustment between the inner and outer blades to ensure accuracy and efficiency.

7.2 ► Blade Adjustment
After the blades are installed, you need to further adjust the front-to-back position of the lower die to ensure the upper and lower dies align accurately when the punch is pressed down. To do this, switch the terminal crimping machine to manual mode. Use the “Down” or “Up” key to slowly lower the upper die, while observing the alignment of the upper and lower dies from the right side.

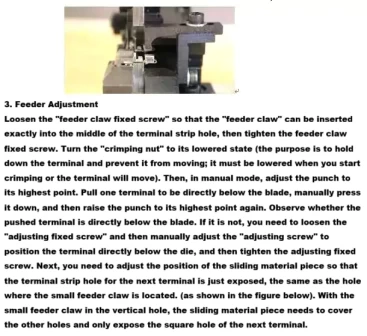
7.3 ► Feeder Claw Adjustment
Next, let’s look at how to adjust the position of the feeder claw. The feeder claw plays a crucial role in the machine; it not only controls the wire placement but also affects the smooth execution of the feeding operation. During the adjustment process, you need to ensure the feeder claw maintains an appropriate proximity to the blade, so it can function effectively without being accidentally pressed by the blade.
At this point, the die calibration is complete. You can try placing the wire in the position shown in the image below and select manual mode to perform a terminal crimp to observe the effect. If the effect is not as expected, you can refer to the previous steps for appropriate adjustments. If the result is satisfactory, you can switch to automatic mode and use the foot pedal switch for continuous operation.